A Quick Tutorial on JET
Yoonsik Cheon
Department of Computer Science
The University of Texas at El Paso
500 W. University Ave
El Paso, TX 79968-0518
ycheon@utep.edu
Abstract
JET is an automated unit testing tool for Java classes annotated with
JML specifications;
JML is a formal interface specification language for Java to
document the behavior of Java classes and interfaces.
JET tests each method of the class under test separately.
For each method, it generates a collection of test data, executes them,
and decides test results (i.e., pass/fail) by
using JML specifications as test oracles, thereby fully automating unit
testing of Java classes.
This document gives a quick tutorial introduction to JET.
1 Introduction
JET [3] is an automated unit testing tool for Java classes
annotated with JML specifications
(refer to Section 2 for JML).
It tests each method of the class under test separately.
Testing with JET is fully automated in the sense that each step of
the testing is performed automatically, including test data selection,
test execution, and test result determination.
Specifically, the following steps are performed automatically
in order to test a method.
- Generate a test case.
A test case for a method generally consists of a receiver object
and arguments.
For example, to test a method void transfer(int, Account)
of class Account,
JET generates two account objects-one for the receiver
and the other for the argument-and selects one integer value.
It generates or selects test data randomly.
For a class such as Account, a random object is created
by making a series of method invocations preceded by a
constructor invocation [5].
- Execute the test case.
The method under test is invoked with the generated test case.
The runtime assertion checks are enabled.
That is, JML specifications for the method, such as method pre
and postconditions, are checked at runtime during the test
execution.
- Decide the test result. The test result (i.e., test pass or fail)
is determined by monitoring occurrences of JML assertion violations.
In general, a precondition violation means that the test case is
inappropriate to test the method, and a postcondition violation means
that the test failed, i.e.,
the implementation doesn't satisfy the specification for
that test case [4].
JET also provides other features.
For example, the generated test cases can be selectively exported
as JUnit test classes for regression testing, as well as
for incorporating manually created test data.
JUnit is a popular unit testing framework for Java to organize
a large collection of test data [1].
In addition, JET can be used as a simple integrated development
environment (IDE) for Java and JML.
Using JET, you can edit, check, compile, and run Java/JML programs.
JET has known limitations.
The primary limitation is that the current implementation
doesn't support Java 1.5 features such as generics.
This is because JML itself doesn't support these features yet.
The JET tool is available for free from the JET website.
Refer to Appendix A.2 for instructions on
downloading and installing JET.
The remainder of this document is structured as follows.
In Section 2 we briefly introduce JML through
an illustrative example that will be used throughout this document.
In Section 3 we explain how to launch JET tool,
and in Sections 4 and 5,
respectively,
we explain the use of JET as an IDE for Java/JML and as an automated
unit testing tool for Java classes.
The appendix at the end gives the complete JML specification of
the running example and instructions on downloading JET.
2 The JML Language
JET uses JML as a test oracle specification language in that
the result of a test execution is determined based on occurrences
of runtime violations of JML assertions.
JML, which stands for the Java Modeling Language, is an interface
specification language for Java to formally specify the behavior
of Java classes and interfaces [6].
In JML, the behavior of a Java class is specified by writing class
invariants and pre and postconditions for the methods exported
by the class.
The pre and postconditions are viewed as a contract
between the client and the implementor of the class.
The client must call a method in a state where the method's
precondition holds, and the implementer must guarantee that
the method's postcondition holds after such a call.
The assertions in class invariants and method pre and postconditions are
usually written in a form that can be compiled,
so that violations of the contract can be detected at runtime.
public class Account {
  private /*@ spec_public @*/ int bal;
  //@ public invariant bal >= 0;

  /*@ requires amt >= 0;
    @ assignable bal;
    @ ensures bal == amt; @*/
  public Account(int amt) {
    bal = amt;
  }

  /*@ requires amt > 0 && amt <= acc.bal;
    @ assignable bal, acc.bal;
    @ ensures bal == \old(bal) + amt
    @   && acc.bal == \old(acc.bal - amt); @*/
  public void transfer(int amt, Account acc) {
    acc.withdraw(amt);
    deposit(amt);
  }

  // The rest of the definition ...
}
Figure 1: Example JML specification
Figure 1 shows an example JML specification.
JML assertions are written as special annotation comments
in Java source code, either after
!//@! or between !/*@! and !@*/!.
The keyword !spec_public! in line 2 states that the private field !bal! is treated as public
for specification purpose; e.g., it can be used in the specifications
of public methods.
The next line specifies a class invariant stating that the value
of bal is always non-negative.
As shown in lines 5-7, a method (or constructor) specification
precedes the declaration of the method (or constructor).
The !requires! clause specifies the precondition,
the !assignable! clause specifies the frame condition
(that states which state variables may be changed),
and the !ensures! clause specifies the postcondition.
The keyword !! in line 14 denotes the pre-state value of its expression, i.e., the expression
is evaluated just before the method invocation;
it is most commonly used in the specification of a mutation method
such as !transfer! that changes the state of an object.
The complete specification of the Account class is
found in Appendix A.1.
For more information about JML including tools [2],
tutorials, example specifications, reference manual, technical papers,
and other documents,
refer to the JML website at http://www.jmlspecs.org.
3 Running JET
JET can be freely downloaded from the JET website
(see Appendix A.2).
The binary distribution of JET includes an executable JAR file,
most likely named jet.jar.
To launch the JET tool, run the executable JAR file.
To run an executable JAR file, you can use the -jar option of
the java command; e.g.,
type the following line on the command prompt.
java -jar jet.jar
Alternatively, you can double-click the executable JAR file on
an operating system like Microsoft Windows;
however, this works only if the Java Runtime Environment (JRE)
is installed and JAR files are associated with the JVM.
4 Developing Java Programs with JET
You can use JET as a simple integrated development (IDE) for
Java/JML.
In this section we will develop a Java "hello world"
program using JET.
In particular, we will create a Java program file,
edit the source code,
compile it, locate and fix compilation errors,
and run the compiled bytecode file.
4.1 Creating Java Programs
We will first write our small program by creating
an empty file, editing it, and saving it to a file named
HelloWorld.java.
You can create a new Java file or open an existing file by using
either the File menu or the directory browser.
The directory browser is located at the left side of the GUI
and allows one to browse directories and Java files
(see Figure 2).
Here we will use the directory browser to create an empty
file and open it for editing.
Figure 2: Creating a new file
Let us first create a new empty file named
HelloWorld.java.
For this, first select the parent directory-the directory in which
to create the file-by expanding all its ancestor directories
starting from the root directory.1
With the parent directory selected, click the right button of
the mouse to bring up the pop-up menu
(see Figure 2).
From the pop-up menu, select the New menu item.
The system will show a dialog window asking the name of
the file to be created.
Enter HelloWorld.java and click the OK button.
The file will be created and listed under the selected
parent directory.
Let us next edit the newly created file.
For this, select the file and choose Open from the
pop-up menu or drag and drop the file to the main pane of the GUI where
the JET logo is displayed.
The file will be opened for editing and its (empty) contents
will be displayed in the built-in Java/JML editor.
Type in the following code in the editor.
  public class HelloWorld {
   public static void main(String[] args) {
    System.out.println("Hello, world!");
   }
  }
Once typing is done, let us save the file.
For this, use either the Save menu item of the File menu
or the corresponding tool bar icon button.
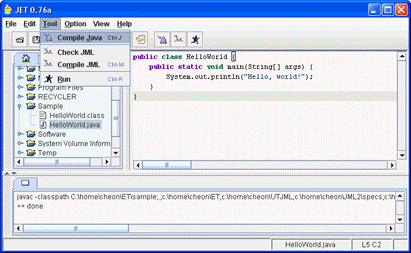
Figure 3: Compiling Java programs
4.2 Compiling Java Programs
Let us now compile our little program.
For this, select the Compile Java menu item from the Tool
menu (see Figure 3);
you can alternatively click the corresponding tool bar icon button.
This will make JET to compile the current file being edited,
i.e., HelloWorld.java.
If there is no compilation error, a bytecode file named
HelloWorld.class will be created and listed
in the directory browser (see Figure 3).
Otherwise, compilation error messages will be displayed in
the output pane that will appear at the bottom.
The source of a compilation error can be easily located by
clicking the error message line that displays the file name
and line number in the output pane.
The editor will highlight the corresponding line of the source code
file.
Note that JET uses a default Java compiler to compile Java programs,
and depending on your environment you may need to change the
default compiler for the compilation to work.
The default compiler can be changed with the Option menu
(see Section 4.4).
4.3 Running Java Programs
You can run the compiled bytecode file by either selecting
the Run menu item from the Tool menu or clicking
the corresponding tool bar icon button.
The output of the program, if exists, will be displayed in the
output pane at the bottom; the output pane will appear automatically
if it's not already shown yet.
In our case, a Hello, world! message will be displayed.
As in compilation, JET uses a default JVM to run Java programs.
Depending on your system settings, you may need to change
the default JVM to be able to run a Java program.
The default JVM can be changed with the Option menu
(see Section 4.4).
4.4 Configuring JET for Compilation
When you run the JET tool for the first time, you may need to
tell JET which Java compiler and JVM you want to use for compiling and
running Java programs, respectively.2
By default, JET uses the commands javac and java
for Java compiler and JVM, respectively.
If these commands are not available on your system or if you want
to use a different compiler or JVM, you need to change the default
values.
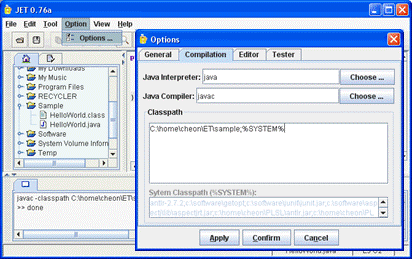
Figure 4: Configuring JET for compilation
To change the default Java compiler or JVM, select the
Options menu item from the Options menu
(see Figure 4).
A dialog window will appear that allows you to change
various JET options, including compilation options.
Select the Compilation tab from the list of tabs at the top.
In the tabbed pane, you can now set the Java compiler or JVM
by specifying a command or executable file.
You can also set other compilation options such as CLASSPATH.
5 Testing Java Classes with JET
In this section we will learn how to perform a fully automated
unit test for a Java class annotated with JML specifications.
In general, you first compile the class with the
built-in JML compiler and then load the compiled bytecode file.
JET will display all the public methods including constructors
of the class.
You select a set of methods to test, and JET will test one method
at a time from the selected set of methods by generating and executing
test data and showing the test results.
5.1 Compiling a Java Class for Testing
Let us test the Account class shown in
Section 2.
The complete definition of the class is found in
Appendix A.1.
The first step of automatic testing is to compile
the class with the built-in JML compiler.
For this, let us either create the Account class
(see Section 4.1)
or download it from the JET website
(see Appendix A.2).
If you download it from the website, open the file with JET;
we will not actually edit it but we need to open it first
to compile it.
For this, use the Open menu item of the File menu;
alternative you can drag the file from the file browser and drop it to
the editor (or the main pane if the editor is not active).
Compiling a class with the built-in JML compiler is similar to
compiling it with a Java compiler
(see Section 4.2).
To compile the Account class,
select the Compile JML menu item from the Tool menu
or click the corresponding tool bar icon button.
If there is no compilation error, a bytecode file named
Account.class will be created and displayed in
the directory browser.
If there is any compilation errors, error messages will be displayed
in the output pane, and their sources can be located
by clicking the error message lines that
display the file names and line numbers
(see Section 4.2).
5.2 Loading a Bytecode File for Testing
The next step is to load the compiled bytecode file to JET.
To load a bytecode file for automated testing, you can either
use the pop-up menu of the directory browser or drag and drop the file
directly to the editor (or the main pane if the editor is not active).
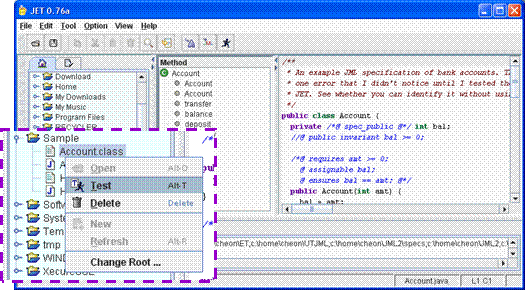
Let us load the Account class.
For this, select the bytecode file Account.class from
the directory browser and press the right button of the mouse to
bring up the pop-up menu (see Figure 5).
From the pop-up menu, select the Test menu item.
The system will load the selected class and show all the public
methods of the class that can be tested in the Methods pane
(see Figure 5).
We will test some of these methods in the next subsection.
Figure 5: Loading a class
5.3 Testing Methods
We are now ready to test the methods of the Account class.
It is simple to test the loaded class.
You only need to select a set of methods to test and
initiate an automated test by clicking some menu item
of the pop-up menu of the methods pane.
Let us actually test a method of our account class,
say the transfer method.
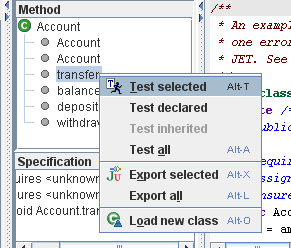
First, select the method from the methods pane and press
the right button of the mouse to bring up the pop-up menu3
(see Figure 6).
Then, select the Test selected menu item.
Figure 6: Testing a class
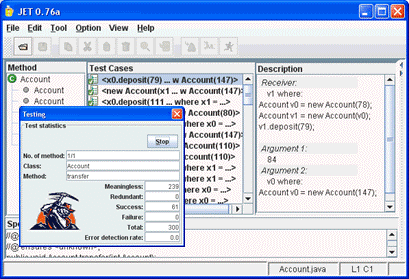
The system starts testing the selected method by listing
generated test data along with their test results one at a time
(see Figure 74).
It also shows in a dialog window test statistics, e.g.,
the numbers of meaningless (or invalid) test cases,
successful test cases, and failed test cases.
The generated test cases are shown in the Test Cases pane.
A check mark in the listing indicates a successful test case;
all tests succeeded.5
If you click a particular test case, the system will display
the details of the test case in the Description pane.
For example, the description pane of Figure 7
shows the details of the first test case, consisting of
a receiver of type Account and
two arguments, an int value and an Account object,
respectively; remember that we are testing the transfer method
that transfers a given amount of money from one account to another.
Figure 7: Test results
Our first automated test with JET was not that productive,
as we didn't find any error.
Let us inject a fault to the Account class to learn
how JET detects and reports a test failure.
Edit the Account.java file to change the definition of
the transfer method as follows.
public void transfer(int amt, Account acc) {
 acc.withdraw(amt);
 // orig. was: deposit(amt);
 deposit(amt + 10);
}
For this editing, you may first need to enable the editor
using the View menu.
If necessary, also enable the directory browser to drag and drop
the source code file to the editor.
Once edited, save the file and compile it with the JML compiler
(see Section 5.1).
Finally, load the compiled bytecode file again
(see Section 5.2).
Now, retest the transfer method.
You will see at this time that all generated test cases
fail (see Figure 8).
If you click a failed test case, the system will display
the reason of failure, as well as the description of the test data.
For example, the first test case of Figure 8
failed because it violated the assertion on line 25 of
Account.java.
If you click the error message giving the file name and line
number of the violated assertion,
the system will locate the violated assertion by highlighting
the corresponding source code line in the editor,
if necessary, after opening the file first
(see Figure 8).
Figure 8: Locating the source of a test failure
5.4 Exporting Tests as JUnit Classes
You can export generated test cases as JUnit test classes.
This is handy not only for regression testing but also
for integrating automated testing with manual testing.
Let us export some of failed test cases from
Section 5.3.
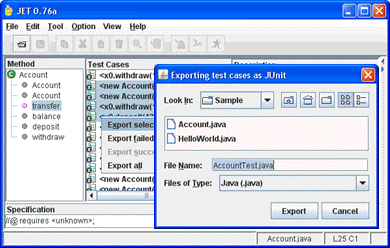
First, select several test cases from the Test Cases pane
(see Figure 9);
to select multiple test cases, press both
the control (or shift) key and the left mouse button
at the same time.
Then, press the right mouse button to bring up the pop-up menu.
From the pop-up menu, select the Export selected menu item.
As shown in the figure, the system will ask for the file name of
the JUnit test class;
use the default (i.e., AccountTest.java).
All the selected test cases will be exported to the named
test class as JUnit test methods, one test method per test case.
You can compile and run the exported test class like any Java programs
as you do with other JUnit test classes.
As an exercise, open the exported test class with JET.
Can you see how a test case is translated to a JUnit test method?
Compile and run the test class with JET.
Does it give the same test failures?
As another exercise, first fix the fault that we introduced in
Section 5.3 (by recompiling it with the
JML compiler) and then run the exported test class again.
Do all test cases succeed at this time?
Can you see how you can use the exported test class
for regression testing?
Figure 9: Exporting tests
5.5 Abstract Classes and Interfaces
JET generates test data randomly.
For a class type such as Account, it generates a random
object as a sequence of method invocations preceded by a
constructor invocation;
examine some of the test data generated for the transfer
method in Section 5.3.
How does JET generate random objects for abstract classes
or interfaces?
It simply can't; the only value it can generate is null.
However, if you specify concrete implementation classes
for abstract classes or interfaces, JET will create random objects
of the concrete classes and use them when instances
of the abstract classes or interfaces are required.
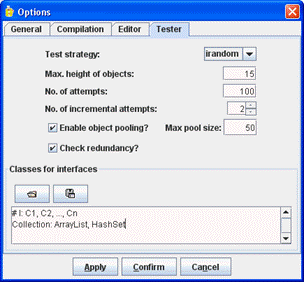
You can specify concrete implementation classes for abstract
classes or interfaces by using the Options menu.
Click the Tester tab (see Figure 10).
As shown in Figure 10, for each abstract class
or interface you can specify a list of concrete classes separated
by a comma.
If, as in the example, more than one concrete class are specified
for the same abstract class or interface, the system picks a class
randomly; e.g., either ArrayList or HashSet
will be used for the Collection interface.
Besides specifying concrete implementation classes,
there are several other options that you can set, such as
checking redundancy of generated test data,
reuse of generated objects through object pooling,
and the maximum number of attempts for generating valid test data.
However, some of these options are likely to be changed
as JET continues to evolve.
Figure 10: Setting test options
5.6 Incorporating Manually-written Test Data
Automated testing is fast and cost-effective.
However, it may not be able to find or generate
specific or particular test data that a tester has in mind.
JET allows you to complement automatically-generated
test data with manually-written test data.
Basically, you extend JET-exported test classes
with manually-written JUnit test methods.
Let us add a manually-written test method to
the AccountTest class that we exported in
Section 5.4.
For the ease of maintenance, instead of directly modifying
the exported test class, let us introduce a new class,
say ImprovedAccountTest, as a subclass of
the exported class.
Let us assume that you want to include a new test case for
transferring the whole balance of the argument account.
Then, all you need to do is to add a new JUnit test method,
something like the following, to ImprovedAccountTest.
  public void testTransferImproved() {
   Account r = new Account(100);
   Account a = new Account(200);
   r.transfer(200, a);
   assertEquals(300, r.balance());
   assertEquals(0, a.balance());
  }
Alternatively, rather than writing your own test oracles
in terms of JUnit's assert methods as shown above,
you can use JML specifications as test oracles.
For this, construct test data and simply call the test oracle
method oracleTransfer by supplying the constructed test
data;
the test oracle method is generated and exported as a part of
the exported JUnit test class (i.e., AccountTest).
  public void testTransferImproved() {
   Account r = new Account(100);
   Account a = new Account(200);
   oracleTransfer(r, 200, a);
  }
As an exercise, add boiler-plate JUnit methods such as
suite to the ImprovedAccountTest class;
for a hint, look at the exported class AccountTest.
Use JET to edit, compile, and run it.
6 Conclusion
In this tutorial we explained the basic use of JET both as
a fully-automated unit testing tool for Java classes
and as a lightweight IDE for Java/JML.
As a research product, JET will continue to evolve, e.g.,
by incorporating different techniques for generating test data.
We welcome comments, suggestions, or feedback on the JET tool itself,
as well as this tutorial.
Acknowledgment
The development of JET was supported in part by the National Science
Foundation under Grant No. CNS-0509299 and by a contract from the US
Army Space and Missile Defense Command (SMDC) and the Homeland
Protection Institute (HPI) to the Center for Defense Systems Research
(CDSR) of the University of Texas at EL Paso (UTEP).
A Appendix
A.1 JML Specification of Class Account
The complete definition of class Account including
JML specifications is given below;
it is also available online at the JET website
(see Appendix A.2).
A.2 Downloading JET
The JET tool is written in Java and freely available to download from
its website at http://www.cs.utep.edu/cheon/download/jet.html.
Besides an executable JAR file, you will also find source code,
API specifications, and other documents from the website.
References
- [1]
-
K. Beck and E. Gamma.
Test infected: Programmers love writing tests.
Java Report, 3(7):37-50, 1998.
- [2]
-
L. Burdy, Y. Cheon, D. R. Cok, M. D. Ernst, J. R. Kiniry, G. T. Leavens,
K. R. M. Leino, and E. Poll.
An overview of JML tools and applications.
International Journal on Software Tools for Technology
Transfer, 7(3):212-232, June 2005.
- [3]
-
Y. Cheon.
Automated random testing to detect specification-code
inconsistencies.
Technical Report 07-07, Department of Computer Science, The
University of Texas at El Paso, 500 West University Ave., El Paso, TX, 79968,
Feb. 2007.
To appear in SETP 2007, Orlando FL, July 9-12, 2007.
- [4]
-
Y. Cheon and G. T. Leavens.
A simple and practical approach to unit testing: The JML and
JUnit way.
In B. Magnusson, editor, ECOOP 2002 - Object-Oriented
Programming, 16th European Conference, Máalaga, Spain, Proceedings,
volume 2374 of Lecture Notes in Computer Science, pages 231-255,
Berlin, June 2002. Springer-Verlag.
- [5]
-
Y. Cheon and C. E. Rubio-Medrano.
Random test data generation for Java classes annotated with JML
specification.
Technical Report 07-11, Department of Computer Science, The
University of Texas at El Paso, 500 West University Ave., El Paso, TX, 79968,
Mar. 2007.
- [6]
-
G. T. Leavens, A. L. Baker, and C. Ruby.
Preliminary design of JML: A behavioral interface specification
language for Java.
ACM SIGSOFT Software Engineering Notes, 31(3):1-38, Mar. 2006.
Footnotes:
1The root directory
of the directory browser can be changed from the pop-up menu
or the Option menu.
2The JVM is also used
to run the built-in JML compiler for automated testing
(see Section 5) .
The JML compiler is a Java application.
3You
can also test multiple methods at the same time by
selecting multiple methods.
To select multiple methods, press both the control (or shift) key
and the left mouse button at the same time.
4The figure shows only
the tester pane. By using the View menu, you can hide all
other panes
such as the directory browser, the editor, and the output pane.
5This is also indicated by the green
colored bullet in the methods pane.
File translated from
TEX
by
TTH,
version 3.77.
On 13 Jun 2007, 15:53.


